Wednesday, June 26, 2013

Microchip PIC16F688

I had used the Microchip PIC16F688 for many applications up to now such as Motion Control, Remote Control, Sony PS1 keypad emulator, etc. I came across a tear down for Nike+ product and it is interesting to find Microchip PIC16F688 on board. The PIC16F688 is used to control the Nordic RF transmitter, nRF402. The communication between these two devices are via Serial Peripheral Interface or in short SPI.


Next topic I will discuss further on SPI communication, different mode of SPI and all.  See ya next time......

Using Microchip MCU Timer 0

All Microchip micro-controllers, from PIC10F to PIC32F, has Timer 0 module.  Few years back the Timer 0 module only support 8-bit timer but later in some part Microchip enhanced the Timer 0 module to include the 16-bit timer.  


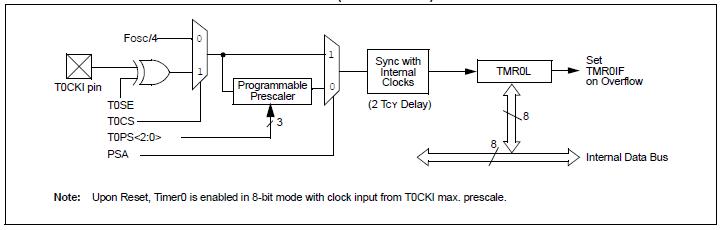
The block diagram on top is the 8-bit Timer 0 module and bottom is the 16-bit Timer 0 module.  Referring to the block diagram, both the front end blocks are the same except the timer registers, TMR0L and TMR0H (TMR0 High Byte).  

If Timer 0 module is configured as 8-bit timer (set T08BIT bit in T0CON register), only TMR0L register is used.  Else, if configured as 16-bit timer (clear T08BIT bit in T0CON register), TMR0L and TMR0H register are used.  TMR0H is actually a high byte of TMR0L which is not directly readable or writable, any write/read on/from TMR0H has no effect.  In order to read the 16-bit timer, one just need to read the TMR0L register.  Likewise, any write to TMR0L register will also write TMR0H in 16-bit timer mode.

Moving from left to right of the block diagram, the input clock can be either from T0CKI pin or internal instruction clock cycle (Fosc/4) where Fosc is the micro-controller operating clock.  If the clock input from T0CKI pin, one needs to define the timer count increment on high-to-low or high-to-low transition of the clock at T0CKI pin.  It can be set via PSA bit in the T0CON register.

The Prescaler is programmable where it is used to slow down the clock count, basically.  The 3-bit Prescaler is used to select which prescaler to use with the timer.  It ranges from 1:256 to 1:2.  What does this mean?  If you set the Prescaler to 1:2 meaning every 2 clock transition it only counts as 1 count.  

How do you calculate the timer period with Prescaler?
For example, operating clock is 4 MHz (Fosc) and Prescaler is set to 1:32.  
Instruction clock cycle =  Fosc/4 = 4 MHz/4 = 1 MHz
After Prescaler = 1 MHz / 32 = 31.25 kHz, or 1 tick = 32 uSec

One can monitor the Timer 0 interrupt flag bit in order to determine timer set has expired or overflow. 

How do you set the Timer 0 to overflow every 1 mSec?
From the example above, 1 tick is 32 uSec.  
For 1 mSec, number of ticks = 1 mSec / 32 uSec = 31.25 tick ~ 31 ticks
Set Timer 0 to 31 ticks to overflow = 256 ticks - 31 ticks = 225 ticks (8-bit timer mode)
After setting TMR0L to 225, it will counts from 225 to 256 and roll over to 0.  Rolling over will assert the TMR0 interrupt flag bit.  One can monitor the TMR0 interrupt flag bit to determine the time expire or overflow.  
NOTE: Please make sure to clear the TMR0 interrupt flag bit else it keeps going into the interrupt service routine and if polling method is used it will directly skip the code.

For 16-bit mode, the maximum number of ticks is 65536 instead.
Set Timer 0 to 31 ticks to overflow = 65536 ticks - 31 ticks = 65505 ticks (16-bit timer mode)

Please bear in mind some Microchip micro-controllers do have TMR0 on/off bit so need to remember to turn on the Timer 0 module else it won't work.  I hope I cover most of the Timer 0 module function.  If you have any question, please drop me an email.


Monday, June 24, 2013

Timer In Microchip MCU

Timer is a MUST have module in any micro-controller.  Almost all applications require Timer feature some where in the codes and will be heavily used if you are running time event in your code especially when you are using Real-Time-Operating-System (RTOS).  

There are several Timer module in a Microchip micro-controller, smaller part such as PIC10F consisted of Timer0 module and as we move on to larger part such as PIC32F there will be more and more Timer module up to five modules.  

Next, I will drill down in detail on each Timer modules and how to configure them.  


Saturday, June 22, 2013

Watchdog Timer Hung Up Eliminator

First time when I start to work with micro-controller the first I did is to look at the feature summary usually on the first few pages of the datasheet or product manual.  For a beginner, the first word that I came across and a little strange though, "Watchdog".  The first impression to me it is some feature built-in to the micro-controller to watch after the micro-controller to prevent hacker or protect against any theft.  NOT! My impression is way off from the actual usage of "Watchdog".  What is "Watchdog" anyway?

"Watchdog" is a feature built-in to most or all micro-controller / processor to prevent any software hung up in case the code can't get out from an infinite loop.  Once it is enabled, Watchdog timer is running on the background using either the internal oscillator or external oscillator connected to the processor.  Depending on which micro-controller or processor the Watchdog timer can be configured to expire at certain time period.  In case of code hung up the Watchdog timer will expire and force the micro-controller or processor to Reset and start the code from beginning.  Due to this the programmer requires to reset the Watchdog timer in the software to prevent from unintentional Reset.   

For Microchip micro-controller the extended Watchdog timer is programmable from as short as 4 millisecond to as long as 2 minutes.  In order to enable the Watchdog timer in a Microchip micro-controller one just set a bit in the Configuration Bit.  For PIC18F2XK22, the Watchdog timer configuration is resided in CONFIG2H (different Microchip micro-controller will have different location for the Watchdog timer configuration).  For resetting the Watchdog timer, the Assembly code is "CLRWDT" that will takes 1 instruction cycle to execute and if you are using Hi-Tech C-compiler just write "CLRWDT();" to reset the Watchdog timer.

That's all about Watchdog timer.  To know more about Watchdog timer, you can get a general definition from Wikipedia (http://en.wikipedia.org/wiki/Watchdog_timer).  Next time I will share with you on Timer module in a micro-controller.

The First Encounter

My first encounter on embedded systems is during my final year at university back in the 90's.  I took the digital design laboratory class and it is the first time I had the chance to work with Motorola 8051 micro-controller.  I used the micro-controller for robotics arm control for final year project.

We have seen embedded systems come a long way and with the most powerful processor in the market, we couldn't imagine all the applications we can create where we turn most of our childhood dream into reality.